Showing posts with label own design. Show all posts

Friday, July 08, 2011

Introducing Billy and Belinda Buttons

Finally, I can introduce you to Billy and Belinda!

I made them in April/May, wrote up the pattern, photographed them and emailed everything off for the Inside Crochet amigurumi competition!


Billy & Belinda in Inside Crochet, issue 20


Here are pages 10 and 11 of issue 20 of Inside Crochet. See those two adorable bears in the middle? Well, Billy's on the left and Belinda's on the right! If you look closely, you can just about make out my name underneath as a runner up in the competition!


P5120427


Wow - I am so delighted! Somehow I knew as soon as I'd finished Billy and Belinda that they would do well in the competition - I couldn't even consider the possibility that they wouldn't do well.


P5120414


I love Billy's face - it's somehow very cute and full of character!


P5120423


Billy and Belinda's arms and legs are attached by buttons on their bodies and buttonholes in their limbs. I could see children having fun with that, while other amigurumi limbs are fixed.


P5120426


So their limbs are completely movable, removable and interchangable!

Billy and Belinda Buttons

I'm very proud of Billy and Belinda. The pattern's coming in Inside Crochet in a couple of months.

Thursday, September 10, 2009

Rejiggling

Please excuse the techie talk in this post, I’ve been having a bit of geeky fun here and am rather chuffed with the end result! However, I’ll put the geeky bit at the end, so that you don’t have to read it if you don’t want to!

You’ll see I’ve been tweaking my blog again and now have a navigation bar which appears just under the blog header – this is the techie bit I’m rather pleased with! I’ve put links on there for my designs and tutorials and those pages then link to the relevant blog posts. Once I get it sorted, I’ll also be adding links to PDF versions too.

And to celebrate, I’ve got some new snowflakes too! If you remember, I was posting the designs of the snowflakes I used in my Snowflakes in the Snow biscornu. I’d posted 8 and still needed 3 more, but didn’t like the designs I’d used enough to chart them and post them.

So here are 3 new snowflakes. Note that I haven’t stitched them myself yet, but I’d be interested to see how they work out!


Now for the techie bit!

I was looking for a way to make it easier to highlight and show links to my designs and the tutorials I’ve written, particularly as I’m hoping to add to them going forwards.

I decided I wanted to have separate pages to my blog which could be accessed via tabs just under the header or some kind of navigation bar. I even, briefly, considered moving to Wordpress or Typepad, but I like a lot of the bits I’ve set up here and didn’t fancy having to start from scratch elsewhere.

So I decided to search for any blogger tips or hacks which would let me do something similar here. Now, I’m quite happy fiddling around and making minor changes to my template, but I’d prefer not to have to get into the guts of XML or anything like that, so I wanted a relatively simple solution.

As usual with the internet, one link led to another and I found myself on this page, looking for a post which would supposedly tell me all I wanted to know. Instead I found a link to Add Page Element to Blogger Header and Blog Posts in the header-wrapper and main-wrapper. Using this would mean that I could add widgets above mt blog header, or below the header and immediately above the posts.

And I found another component in my XML template which I changed to allow me to add widgets immediately below my header – the crosscol-wrapper. Once I’d found that I knew how to create a simple navigation bar for the pages I wanted.

I haven’t seen this written up anywhere, and it’s the simplest way of adding a navigation bar I can think of! Once I added widgets to the crosscol-wrapper, I could add a HTML/JavaScript widget there and in that write some simple HTML for a table, with a matching background, and a cell for each page I wanted to link to on the navbar!

The links on the navbar just link to blog posts I’ve created for 01.01.2001, completely separate from my normal blogging.

How simple is that?

Wednesday, June 17, 2009

Never again!

For the latest exchange on the Tiny Treasures Exchange, I had to make a floss ring tag for my partner.

It was my first floss ring tag and, at this point in time, it feels like my last! Yes, I enjoyed stitching the little design I used, but the finishing of the tag itself was rather a nightmare!

Perhaps as it was my first I should perhaps have made a square one that I could have whip-stitched together, but I chose instead to make an oval one and had no end of problems trying to get the outlines of the two sides to match up, even though the were identical to begin with! All I can say is, thank goodness my glue didn’t dry too quickly as at one point I had to resort to taking it apart completely and starting again.

Even the simple job of making the hole and putting in the eyelets seemed fraught and the end result isn’t quite as neat as I would have liked.

But at least the final result doesn’t look too bad!

My first floss tag

My partner in the exchange was Theresa who emailed at the start of the week to say she’d received the parcel.

Swap parcel

The design I used for the tag is one I designed myself. It’s part of a range of designs I’ve been working on since the early this year. My biggest problem has been finding the time to stitch my designs. Here is the chart - click on the image and you should get a larger version.


I stitched my floss tag on 32 count jobelan from Polstitches, the colour’s called Neptune. I’d originally envisaged the design stitched on white or ecru but as Theresa likes the colour green, I decided to stitch it on green fabric – I rather like the end result.

The final item in my parcel for Theresa was this.

Mystery animal revealed

As she says on her blog, she likes giraffes, so I made her one. And he/she’s so gorgeous I’ll have to make more. I have to confess it’s that first time something I’ve made seems to have appealed to Iona so much – she would pick it up by the head and wander around with it, not letting go! It was a wrench to send it to Theresa!


Ooh - and while I remember, there have been a few changes here at work and at the moment I have very little time left online. I think I'm more or less keeping up with blog reading, but I'm struggling with commenting! I need to find a new sort of balance between everything.

Monday, April 27, 2009

A little something

About 10 days ago, I was temporarily forced to abandon my existing crafty goings-on as I was suffering from withdrawal symptoms!

Withdrawal from what? Ummm, cross stitch and making biscornus?

I hadn’t planned to stitch a biscornu this month as I already had enough going on, but as usual, things didn’t go entirely to plan. As a compromise, I decided to make my biscornu smaller than usual, but that led to me challenging myself to see how small I could go!

And the end result?

P4251352

It actually has me wondering whether it would be possible to make tiny mini sized biscornus and use them instead of buttons on a ‘normal’ sized biscornu. Hmmm ……

The design is very simple. Part of my inspiration for the larger biscornu was this photo from Loreta – I love the way the buttons stand out.

P4241322

Two squares, each 30 stitches x 30 stitches. Divide each side in 3 to create a grid of 9 squares. I then filled in alternate squares of the grid with cross stitch, using a varigated DMC floss and then attached a button to the centre of each square except the middle one. The biscornu was then made up as usual with further buttons attached to the centre of each side.

The tiny biscornu is based on a square 10 stitches by 10 stitches, each filled with a Jessica stitch. I wasn't sure how the Jessica stitch would stand up to the bending when the biscornu was made up, but it's working well.

April biscornus

I love the way the biscornus look in my Granny's pansy bowl. I thought the pansy colours would look nice with the biscornu colours.

I’ve also succumbed and joined for Totally Useless SAL! I’d been watching for a while, but it was time I joined in.


Here’s my collection for this month. Not a lot yet - there are various bits of whitish floss and thread and some more colourful yarn from the easter eggs I made for Alexander to hunt in the garden.

Monday, March 23, 2009

Life without stash

Well, hopefully this week will return a bit more to normal! Last week just seemed to descend into chaos and I feel as if I'm still recovering from the 3 hours I spent last Wednesday night comforting Alexander while he threw up! Fortunately, he's recovered now and went back to school today.

Consequently, my head feels as if it's stuffed with cotton wool today and I'd like nothing better to do than to stick my head in the sand and wait for today to go away!

I don't have any stitchy pictures to share at the moment - I've stitched and crocheted quite a lot over the last couple of weeks, but everything I've made is being sent to someone else from my biscornu in the Tiny Treasures Exchange (which I managed to send off to my partner without photographing ), to gifts and birthday presents for various friends.

However, I though I'd share with you a couple of photos of my bedroom to illustrate the title of this post.


It really was my bedroom up until 2 or 3 weeks ago! There's still a bed in there somewhere! The room has now been filled with the contents of our loft (at least 15 years of it) as we're having new loft insulation laid today, courtesy of the local council - and who'd say no to that? I'm now sharing bunk beds with Alexander - me on top, him below. (DH won't allow Alexander to sleep on the top, convinced he'll roll out in the middle of the night.) I find to top bunk a bit claustrophobic - the ceiling is too near and the side of the bed sticks up to stop me rolling out in the middle of the night!

As to the title of this post - guess where I keep my stash?


Fortunately, all my floss is stored elsewhere and I managed to rescue my box of beads before it became completely inaccessible. And I have one or two things out that I was planning to work on. But, other than that I won't see my stash again until the room is cleared and goodness knows when that will be!


Finally, as requested, here are the rest of the snowflakes from my biscornu.

P1310785

P1300766

I also stitched a variation on this one (above), using Rhodes stitches instead of the eyelets. I think the eyelet version came out better - I certainly liked it better, and, typically, I don't seem to have a photo of the Rhodes stitch version.

P1310783

So, if you take the four snowflakes described here, the four snowflakes in this post and the four of Janet Perry's December twinchy snowflakes, that makes 12. The other ones I stitched were based on images I found on Flickr, but I don't like them enough to chart them and post them here. So, if your want to stitch the 15 sided biscornu, you'll have to make up another 3 yourself! LOL! Or if the inspiration strikes, I'll make up some more myself!

The tutorial on putting together the 15 sided biscornu is here.

I'll go away now and leave you in peace!

Thursday, February 19, 2009

Family Sampler (with added snowflakes)

9 comments
Well, I kind of took your advice to heart and have put my Family Sampler to the back of my mind just now for a break. I just don't have any new starts yet.

This week is half term, so Alexander is off school and we have my parents staying with us. The down side of this is that my evening stitching time is reduced to a minimum, so even if I had been working on my Family Sampler, I wouldn't have been getting very far and probably would have ended up even more fed up!

Early in the week, I did something completely different and charted some of the showflakes from my biscornu. I was surprised at how how much I enjoyed it and how much of a constructive activity I found it to be. So, since then, I have been gradually charting some of those other little ideas to the extent that they are no longer just 'little' ideas! Now I need to do some 'model stitching' (! LOL) before I'm ready to share. And I'm also pleased with the progress I'm making now on my Basket of Biscornu biscornu.

Here are the charts for some of the snowflakes. If anyone stitches any of them - I'd love to hear about it - and I'd be pretty amazed too!

P1310789
P1300767
P1300768
P1300771

You'll see that I haven't charted the positions of the beads - I'll leave that entirely up to you if or where you add them!

Wednesday, February 04, 2009

Snowflakes in the Snow (with 15 sided biscornu tutorial)

85 comments
Long post with lots of photos, but hopefully useful information!


Snowflakes in the Snow

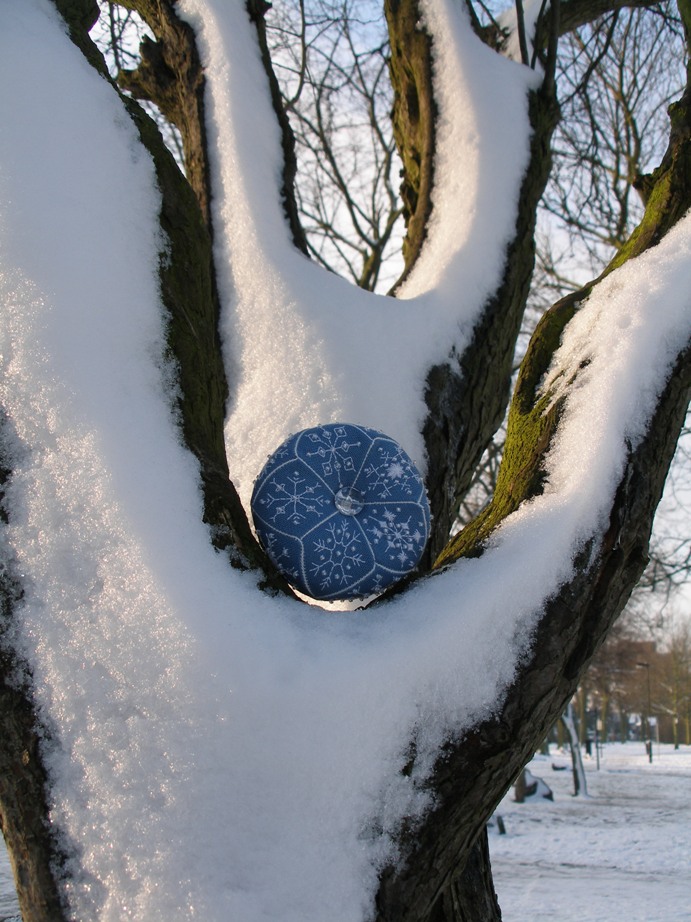
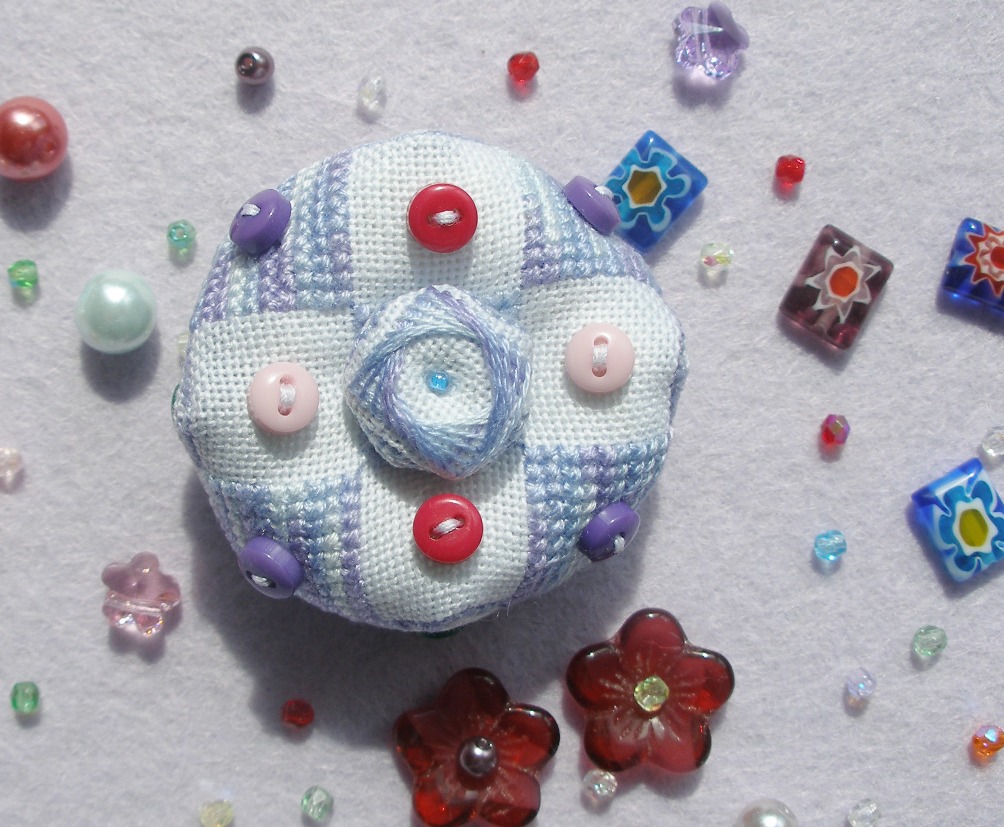
I've been a bit distracted from my planned stitching recently (this seems to be happening faaar too regularly these days) by the above 15 sided biscornu or banurukotti. I first saw these last year here on this Russian blog and then saw that Anita had designed this lovely one too. Somehow the idea of making this kind of thing with a snowflake pattern caught my imagination, but I just didn't manage to find the right snowflakes to stitch.

At last, a couple of weeks ago, I saw this post from Janet Perry for the snowflakes on her December twinchy. That got me started! Janet's snowflakes were just perfect for what I wanted to do, so I printed off the charts and got started.


P1300773

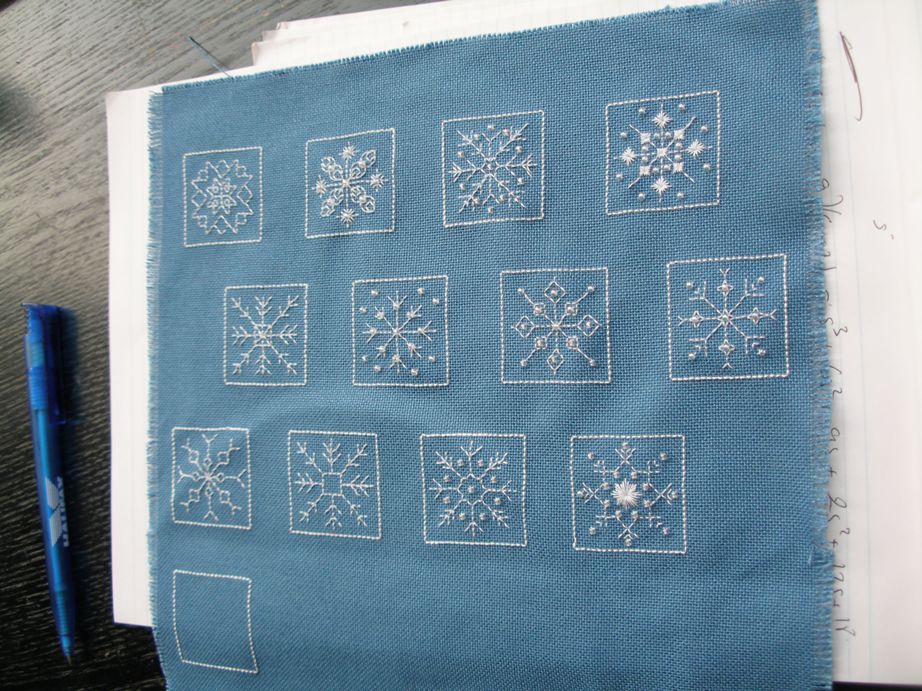
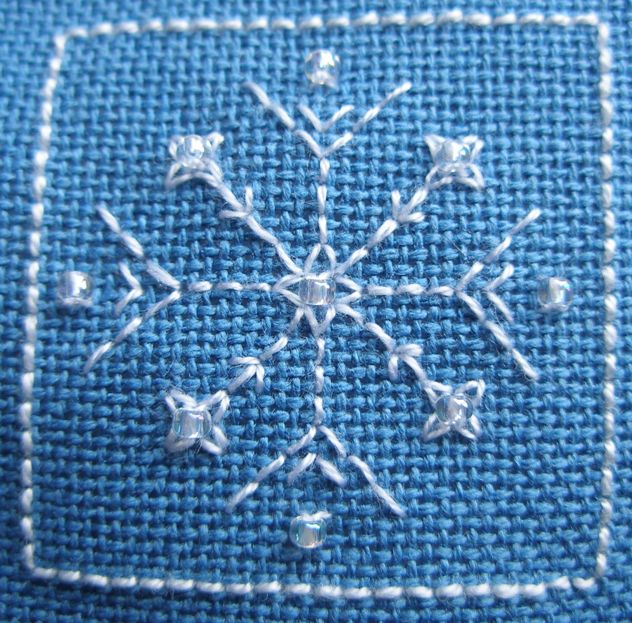
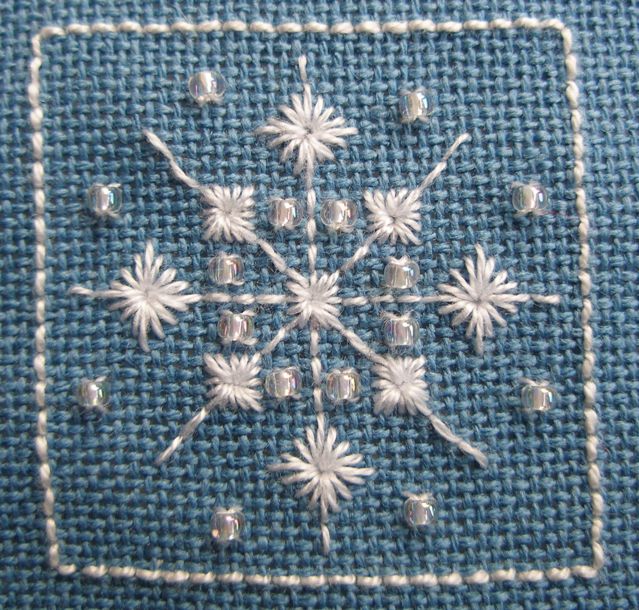
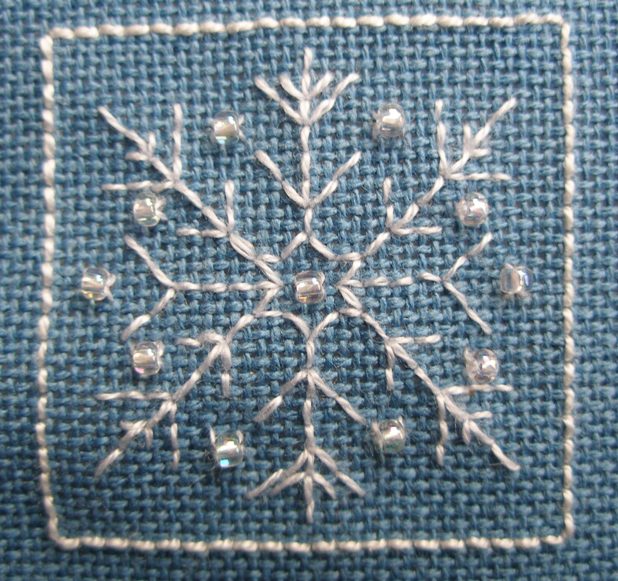
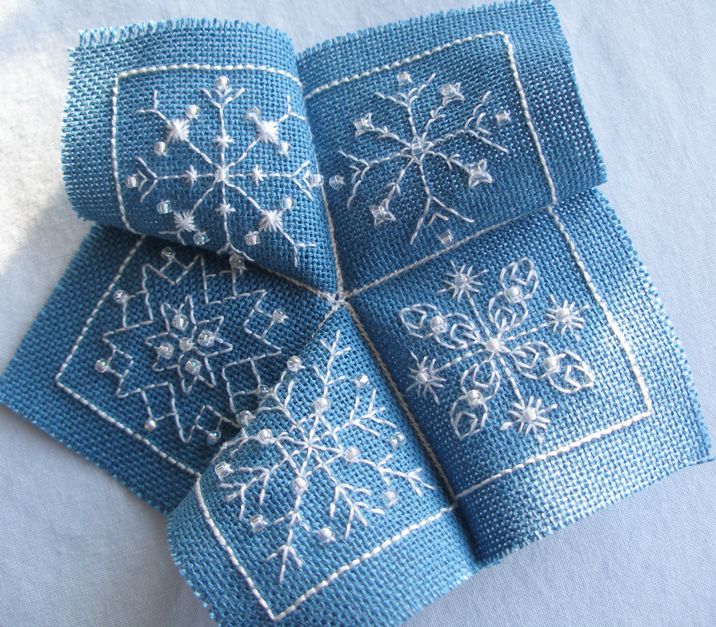
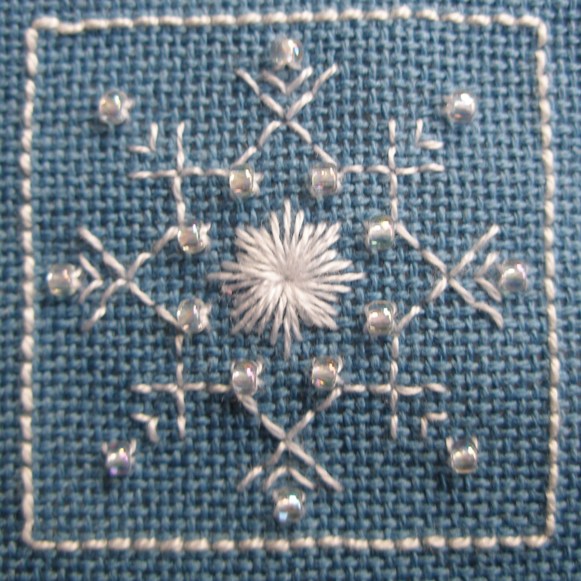
As I got going, I started playing around with Janet's snowflakes, adding beads and trying out different shapes and stitches. And before I knew it, I had ended up with 15 squares each with a different showflake!

Four of the snowflakes are Janet's, one or two were copied from images I found on the internet and the rest are my own. I might chart some of them sometime to share.

As all the tutorials I've seen for this type of biscornu have not been in English, I thought I'd write my own for anyone who's interested.


P1300771

Step 1 - You need 15 stitched squares all the same size. The squares I used were all 20 x 20 stitches. As with a 'normal' biscornu, the outline round the edge of each square was done in backstitch and I used a #12 perle cotton.

When you have your 15 squares, cut them all out leaving a border of at least about half a centimeter.


P1310793

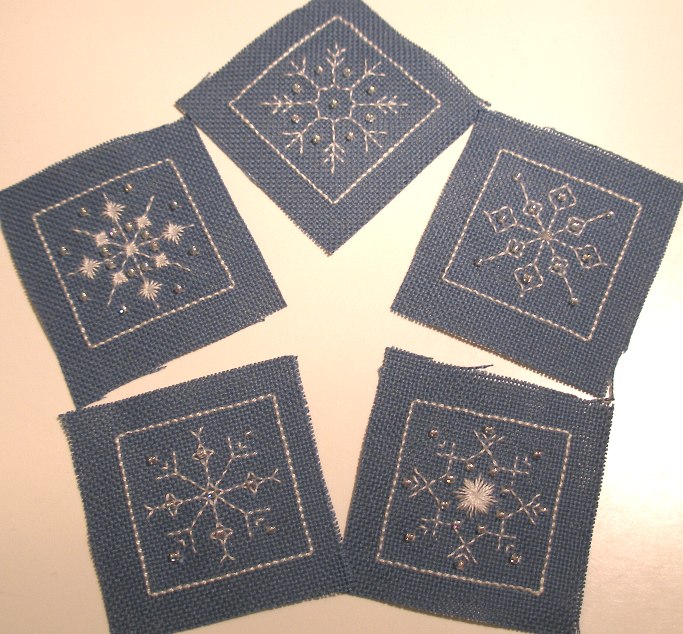
Step 2 - I then divided my squares into 3 groups of 5 squares - 5 squares for the top, 5 squares for the bottom and 5 for the sides.


P1310805

P1310804


I then whipstitched the 5 squares for the top together.


P1310807

When you have joined the 5 squares together, you will have a kind of 5 pointed star. Note that it will not lie flat, however hard you try.

Now, join the 5 squares for the bottom.


P2010817

P2010818


Step 3 - The next step is to join the side squares to either top or bottom. I've tried to show in the photo below how this works with the arrows showing which sides wshould be joined to each other.


putting-it-together

You will end up with something like this.


P2020816

Step 4 - Now you can start to join the bottom/top to the top/bottom plus sides in a similar way to that in which the sides were already joined. I haven't got a photo of this step - not quite sure how I would show it!

Only join about three quarters of the way round so that you leave a gap for stuffing. I use a general toy stuffing to stuff my biscornus.

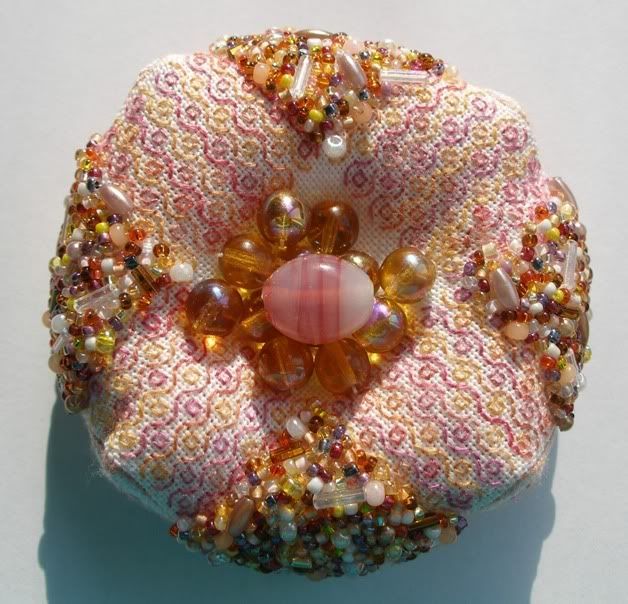
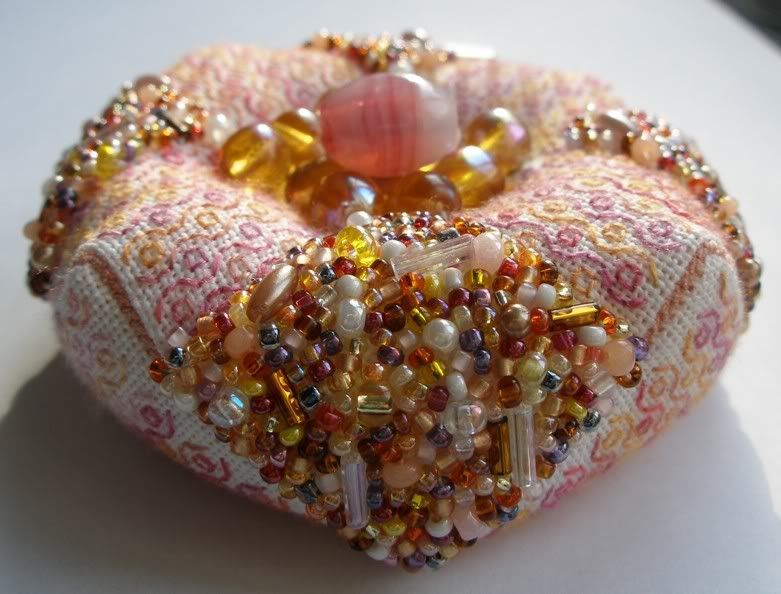
Now, this is a point that I've never seen written anywhere for biscornus or anything else. When I make a biscornu, I sew on the central buttons before I've completed stuffing. I like to have my button in a reasonable indent in the middle of my pin cushion, so, in this case, I half stuffed my biscornu and then attached my button. Then I completed stuffing, working the stuffing around the threads holding the buttons, and stitched the opening closed.

Et voila!


Snowflakes in the Snow

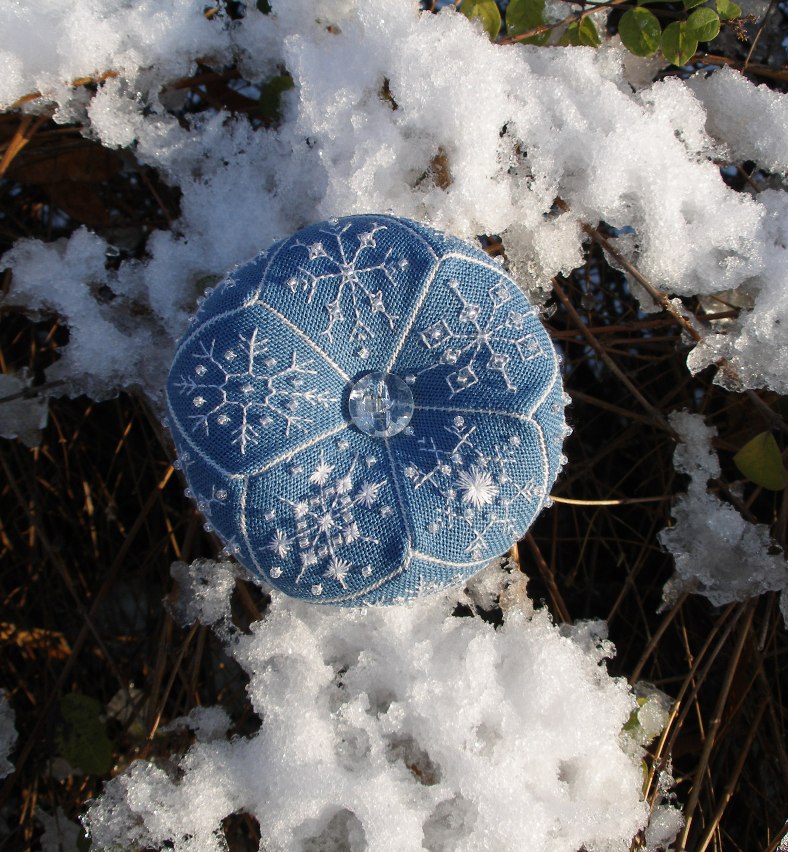
And if anyone saw a mad woman yesterday morning, wandering round Vicky Park with a pin cushion and a camera, yes, I confess, it was me!


~~~~~~~~~~~~~~~~~~~~~~~~~~~~~~~~~~~~~
And before I forget, you can still sign up for my PIF! I'll leave signups open until next Monday and then let you know the result. And for those who've asked, I'm quite happy to post overseas, so don't let that put you off!


~~~~~~~~~~~~~~~~~~~~~~~~~~~~~~~~~~~~~


The snowflake patterns I used in making my biscornu can be found on the following web pages of my blog:

Remember, I also used Janet Perry's December twinchy snowflakes. This gives you 12 snowflakes. I don't have another 3 to share at the moment, so you can either make up your own or wait patiently until I get around to thinking of some more.

My notes on an alternative 15 sided biscornu are here.

Thursday, September 25, 2008

Fun with Science and a Geeky Giveaway

16 comments
+

=


and


This was Alexander's favourite game from the holiday (inspired by Mr Fyde, the science teacher in Captain Underpants). I had to keep a good stock of baking soda and vinegar!

We had Alexander's best friend over for dinner this week and Alexander was demonstrating. The friend was distinctly unimpressed - obviously not a geek then!

We've now got my Dad busy thinking of other simple sciencey experiments for Alexander to do. Apparently, Dad's having great fun with this task! And I've suggested to Alexander that we could grow crystals. However, Alexander seems to be under the impression that crystals mean diamond-type shiny things that are very valuable!

I've actually done some stitching, for a change, over the last few days and have finished off my latest biscornu, designed by me with the blackwork pattern nicked from a book. I call it my Tutti Frutti Biscornu.

Front


Back


This isn't quite what I'd planned for this biscornu as I changed my mind midway. It then became an exercise in crowding on as many beads as I could in the space available using different shapes and sizes of beads. It was fun to do and I do like the end result!

So, for my Geeky Giveaway, how many beads do you think I've used on this biscornu? Leave me a comment with your best guess. I can't give you any clues as I've no idea myself. But if you leave a comment before the end of next Friday (3rd October), I'll send something I've made to the person who makes the closest guess. It won't be the biscornu, but it may well be something I've featured on my blog this year.