Wednesday, June 24, 2009

A Patchwork of Stars

I didn’t manage to stitch a biscornu for the SAL in May, but I’m back on track again in June!

A Patchwork of Stars


A Patchwork of Stars 15 sided biscornu

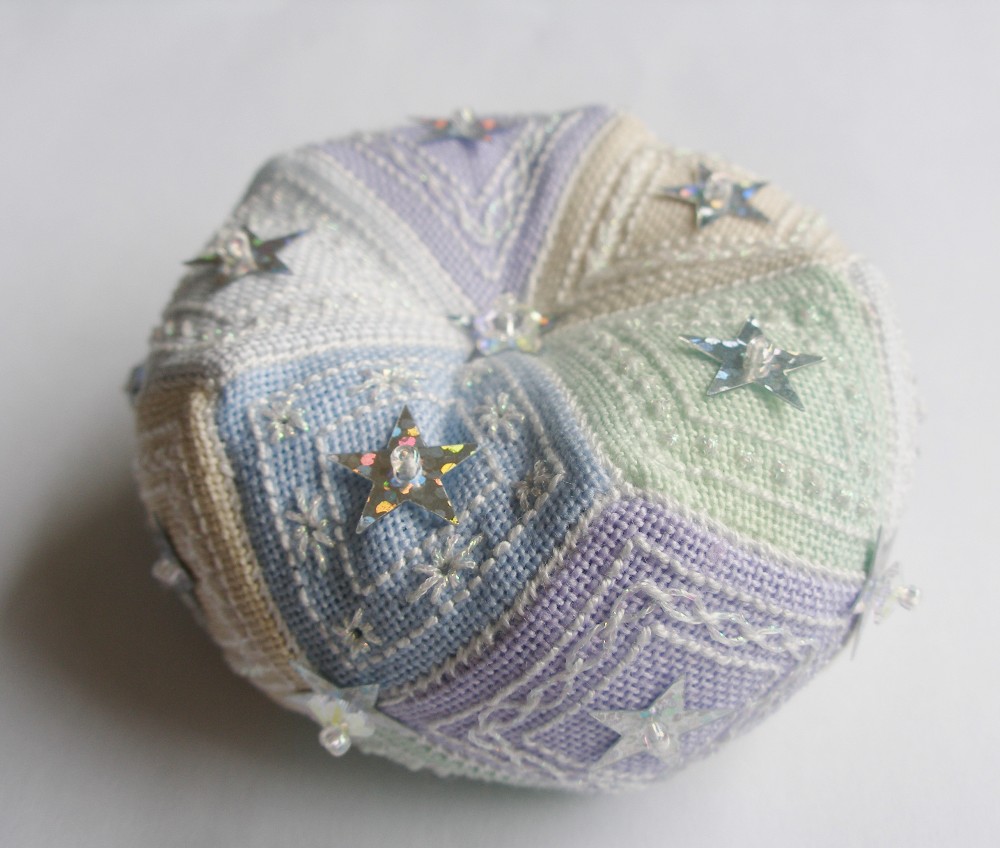
The design is entirely my own, inspired by the way I saw the backstitched squares being distorted as I stitched together my 15 sided Snowflakes biscornu in January. I wanted to make one where the outline squares were important, with something simple to decorate the centre of each square.

I also thought it would be fun and interesting to use different colours of fabric for the different squares, so I kept the floss colours very simple.

Star squares

Here are the details of the design. All stitches are over two fabric threads unless specifically stated otherwise. Three squares of each design should be stitched.

My biscornu uses Polstitches fabric as I had the different colours in my stash already - all are documented below. I'd love to see the fabric/colour combinations others come up with.
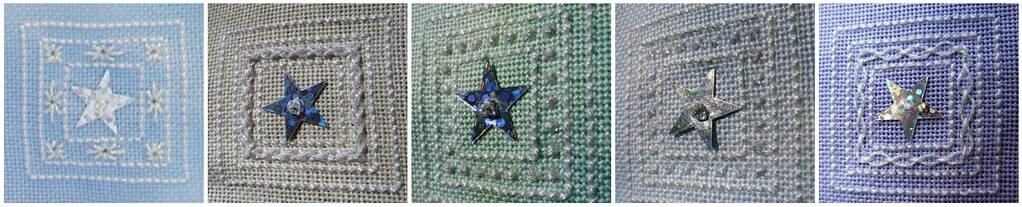

1. Cross stitch


Floss: #12 white perle cotton, Kreinik #8 fine braid shade 032.
Fabric: 32 ct jobelan ‘Rumbles of Thunder’ from Polstitches
Embellishment: 1 silver star sequin and 1 Mill Hill seed bead.

Stitch 3 concentric backstitch squares then one squares of cross stitches as marked by the black squares in the diagram.

The red square marks the centre of the design. At this point, I attach a silver star sequin using a bead to hold it in place, the needle going up through the fabric and the sequin, through the bead and then back down through the hole in the sequin and the fabric.


2. Smyrna cross


Floss: #12 white perle cotton, Kreinik #8 fine braid shade 032.
Fabric: 32 ct jobelan ‘Neptune’ from Polstitches
Embellishment: 1 silver star sequin and 1 Mill Hill seed bead.

Stitch 3 concentric backstitch squares then one squares of Smyrna cross stitches as marked by the starred squares in the diagram.

The red square marks the centre of the design. At this point, attach a silver star sequin using a bead to hold it in place, the needle going up through the fabric and the sequin, through the bead and then back down through the hole in the sequin and the fabric.


3. Interlace

I was very pleased and surprised at how this square worked out – the interlaced running stitch is perfect for what I wanted and it’s so simple to stitch.


Floss: #12 white perle cotton, Kreinik #8 fine braid shade 032.
Fabric: 32 ct jobelan ‘Imagination’ from Polstitches
Embellishment: 1 silver star sequin and 1 Mill Hill seed bead.

Stitch 3 concentric backstitch squares as in the diagram.

Next stitch a square of running stitch mid way between the two inner backstitch squares using white #12 perle cotton. Note that the length of each running stitch is 1½ times the length of each backstitch, ie. each running stitch goes over 3 fabric threads.

The interlacing is done using Kreinik braid by weaving in and out of each running stitch. Work around the running stitch square twice, once following the red curves, once following the green curves.

More information on interlaced running stitch, with diagrams, can be found here.

Attach a sequin in the centre, as for the other squares.


4. Eyelets

I really like these elongated eyelets in the middle of each side!


Floss: #12 white perle cotton, Kreinik #8 fine braid shade 032.
Fabric: 32 ct jobelan from Polstitches (can’t remember the colour at the moment – need to check when I go home!)
Embellishment: 1 silver star sequin and 1 Mill Hill seed bead.

Stitch 3 concentric backstitch squares as in the diagram.

Using the Kreinik braid, stitch the square and elongated eyelets according to the diagram, the needle coming up through the fabric at the outer edge, and back down in the centre.

Attach a sequin in the centre, as for the other squares.


5. Double herringbone


Floss: #12 white perle cotton, Kreinik #8 fine braid shade 032.
Fabric: 32 ct jobelan ‘Mummies Curse’ from Polstitches
Embellishment: 1 silver star sequin and 1 Mill Hill seed bead.

Stitch the 3 concentric backstitch squares as in the diagram.

Between the two inner squares, stitch a square of double herringbone stitch following the diagram below. Stitch following the black line first using #12 perle cotton. Second, stitch the second, red line on top using the Kreinik braid.

Attach a sequin in the centre, as for the other squares.


Instructions for making up a 15 sided biscornu can be found here.

Alternatively, all 15 squares could be stitched using the same design, if you particularly like one of those above, or if you don't feel adventurous enough to try the different stitches. And of course, each of the small square designs could be used on their own to make a scissor-fob or mini-biscornu!

A Patchwork of Stars

I hope all this makes sense! If any of it is unclear - please let me know!


And if you stitch any of these little designs, or the whole biscornu, then let me know and send me a photo! (Email address in my profile!)


Now, what sort of biscornu will I stitch for July? Hmmmm.......

Friday, June 19, 2009

Woohoo – passing on the good news!

I just read today on Claire’s blog that this is coming out on 31st August!


That, of course, sent me off and running to Isabelle Vautier’s blog - I’ve been looking forward to this ever since I first read there that it would be coming! And now we know when!

The details – volume 1 (presumably that means there are more coming? And her blog post mentions volume 2!) of Isabelle’s collection of calligraphic hearts containing a whopping 70 of her fantastic heart designs!

And I mustn't forget that I also promised I'd buy myself this at the same time .....


Wednesday, June 17, 2009

Never again!

For the latest exchange on the Tiny Treasures Exchange, I had to make a floss ring tag for my partner.

It was my first floss ring tag and, at this point in time, it feels like my last! Yes, I enjoyed stitching the little design I used, but the finishing of the tag itself was rather a nightmare!

Perhaps as it was my first I should perhaps have made a square one that I could have whip-stitched together, but I chose instead to make an oval one and had no end of problems trying to get the outlines of the two sides to match up, even though the were identical to begin with! All I can say is, thank goodness my glue didn’t dry too quickly as at one point I had to resort to taking it apart completely and starting again.

Even the simple job of making the hole and putting in the eyelets seemed fraught and the end result isn’t quite as neat as I would have liked.

But at least the final result doesn’t look too bad!

My first floss tag

My partner in the exchange was Theresa who emailed at the start of the week to say she’d received the parcel.

Swap parcel

The design I used for the tag is one I designed myself. It’s part of a range of designs I’ve been working on since the early this year. My biggest problem has been finding the time to stitch my designs. Here is the chart - click on the image and you should get a larger version.


I stitched my floss tag on 32 count jobelan from Polstitches, the colour’s called Neptune. I’d originally envisaged the design stitched on white or ecru but as Theresa likes the colour green, I decided to stitch it on green fabric – I rather like the end result.

The final item in my parcel for Theresa was this.

Mystery animal revealed

As she says on her blog, she likes giraffes, so I made her one. And he/she’s so gorgeous I’ll have to make more. I have to confess it’s that first time something I’ve made seems to have appealed to Iona so much – she would pick it up by the head and wander around with it, not letting go! It was a wrench to send it to Theresa!


Ooh - and while I remember, there have been a few changes here at work and at the moment I have very little time left online. I think I'm more or less keeping up with blog reading, but I'm struggling with commenting! I need to find a new sort of balance between everything.

Thursday, June 11, 2009

Monkey business

I recently took part in Claire's Secret Monket Swap and these goodies arrived yesterday from Ruth.

Monkey business

You can see that Munk the rainbow monkey didn't take long to settle in and was soon making friends with the local monkeys (human and knitted) and was even persuaded to share his sweeties with Zero-X1.

For my part in the swap, I persuaded Daisy to go and live with Sam. I can see from Sam's blog that she is settling in well too, although I think the chocolate helps!

Swap monkey


You can see on Sam's blog. a pic of all the goodies I sent - as usual, I completely forgot to take a photo of everything I sent myself!

I've been keeping the post busy this week as I've also sent off my floss tag for the Tiny Treasures Exchange - that parcel has slightly further to travel but also includes this little mystery.

Crochet mystery animal

I don't know whether this pic gives away it's identity or not!

Tuesday, June 09, 2009

A Use for the Totally Useless SAL

I had an idea!

I read a discussion somewhere, can't remember where, about how some people use the odd cut off ends of yarn for stuffing toys. And as I was chucking some odd threads into my jar for the Totally Useless SAL, I had the sudden thought to make something at the end of the year and stuff it with all the odds and ends from my jar.

What do you think? I have absolutely no idea what it will be yet, but it will me made specially for that purpose and to celebrate the 2009 TUSAL! Anyone like to join me?

Having just checked the TUSAL info, I think if you've got any old needles in among your SAL contribution, you might want to remove them before stuffing them into something! The same goes for floss labels and other harder or oddly shaped stuff. Although it might make for an interestingly shaped and textured object - LOL!

Here's my (better late than never) May contribution to the SAL.


And here's one with a better shot of the jug I use for the photographs.


I have to confess that this jug is a good glass one that I got from my Mum or Granny when somebody was having a clear out and it's far too nice to be used as an ort container. It lives in my display cupboard and only comes out on special occasions (like TUSAL photos).

My normal, unseen, ort jar is an empty Bonne Maman jam jar - I love empty Bonne Maman jam jars - I use them all over the place!

Tuesday, June 02, 2009

Return of the Jedi Stash

Remember this, back at the end of March?


Well, look at it now!!


We have our bedroom back AND I can get at my stash!

The loft has been insulated, and we've sorted through most of the boxes and bags that came down, put a lot of stuff back and got rid of a lot too. Now that everything has gone back, I can hardly believe how empty the loft is! But I'm so pleased to have reduced the 15 years worth of junk! There's even space to put more stuff up there - LOL!

While sorting through all the boxes, I was really pleased to rediscover some of my stash from the 1990s when I first started stitching. Things like these magazines -


I remember falling in love with the cover project but not knowing enought to know what to do about it or how to stitch it. That may be different now.


And this one - see that dragon in the corner? I knew enough to be able to do something about that one.

Dragon pillow


And whatever happened to Needlework magazine?

Of course, I also found cross stitch patterns and a lot of books which I no longer want. Once I sort them out and photograph them, I'll be putting a lot of it up for sale.

There were also one or two odd things in the loft that I was really pleased to find.


I remember occasionally being allowed to play with this tea set when I was a child. I think the pictures are mostly fairy tales, but I've no idea where the donkey comes from, or what it's doing!

And then there were these.


Memories of summer holidays spent collecting cowries on the beach at North Berwick.